

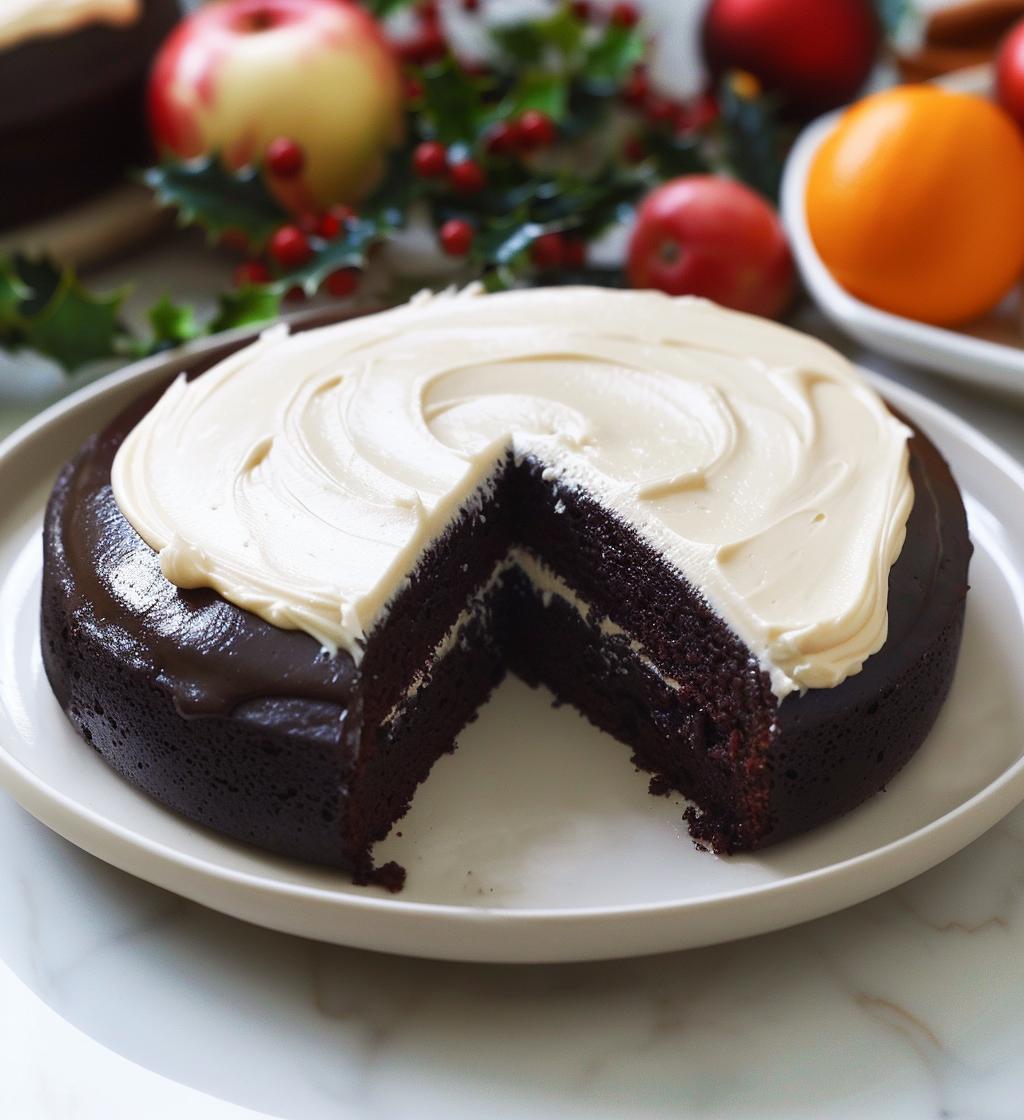
Oh, the magic of holiday gatherings! There’s something truly special about coming together with family and friends, sharing laughter, stories, and a delightful spread of desserts. I’ll never forget the first time I hosted a holiday dessert table; it felt like a sweet symphony of flavors and colors! Imagine an array of treats that not only look stunning but also satisfy every sweet tooth. A holiday dessert table is more than just a collection of desserts; it’s a centerpiece of joy and celebration that invites everyone to indulge and share in the festivities. From rich chocolate cakes to whimsical cookies, each bite tells a story and creates lasting memories. Trust me, this is the highlight of any holiday feast, and I can’t wait to share my favorite recipes with you!
Ingredients List
Here’s what you’ll need to create this delightful assortment for your holiday dessert table. Each ingredient plays a key role in bringing flavors and textures to life, so let’s get into it!
- 2 cups flour: All-purpose flour works perfectly for structure. Make sure to sift it for a lighter texture.
- 1 cup sugar: Granulated sugar adds sweetness and helps with that beautiful crumb.
- 1 cup butter: Use unsalted butter, softened to room temperature for easy mixing. It’s the secret to that rich, buttery flavor!
- 4 eggs: Large eggs are best for binding everything together and adding moisture.
- 1 cup milk: Whole milk keeps things creamy. You can also use almond or oat milk for a twist!
- 2 teaspoons baking powder: This is your leavening agent, giving the cake that lovely lift.
- 1 teaspoon vanilla extract: Don’t skimp on the vanilla; it adds a warm, inviting flavor.
- 1/2 cup cocoa powder: Unsweetened cocoa powder brings that rich chocolate goodness; make sure it’s sifted to avoid lumps!
- 1 cup powdered sugar: For the frosting, it gives you that smooth, sweet finish.
- 1/4 cup cream cheese: This adds creaminess to your frosting, making it utterly irresistible.
Gather these ingredients, and let’s get ready to whip up some holiday magic!
How to Prepare Instructions
Alright, let’s get cooking! This part is where the magic really happens, and I promise it’s easier than you might think. Just follow these steps, and you’ll have a show-stopping dessert in no time!
- First things first, preheat your oven to 350°F (175°C). This ensures your cake bakes evenly and rises beautifully!
- While that’s heating up, grab a mixing bowl and whisk together the flour, baking powder, and cocoa powder. This helps to evenly distribute the leavening agent and avoids any lumps later on.
- In a separate bowl, beat the butter and sugar together until the mixture is light and fluffy. This step is crucial for that dreamy texture—trust me, it’s worth the effort!
- Now, add the eggs one at a time, mixing well after each addition. This helps incorporate air and makes your cake light and tender.
- Stir in the vanilla extract, and then gradually add your dry mixture and milk, alternating between them. Mix until everything is just combined; don’t overdo it!
- Next, pour the batter into a greased baking pan. Give it a little shake to level it out—no one likes a lopsided cake!
- Pop it in the oven and bake for about 30-35 minutes. You’ll know it’s done when a toothpick inserted in the center comes out clean. It’s like hitting that sweet spot of perfection!
- While the cake cools, whip up your frosting by beating the cream cheese and powdered sugar until smooth. Once the cake is fully cool, frost it generously, and let the festivities begin!
And just like that, you’re ready to wow your guests with this delicious creation on your holiday dessert table!
Why You’ll Love This Recipe
This recipe for a holiday dessert table is all about bringing joy and sweetness to your celebrations. Here’s why you’re going to adore it:
- Variety of Flavors: This dessert table features a delightful mix of treats, from rich chocolate cakes to fluffy frostings, ensuring there’s something for everyone’s taste buds.
- Easy to Prepare: With straightforward steps and simple ingredients, you’ll have a stunning centerpiece without spending all day in the kitchen!
- Festive Appeal: The vibrant colors and beautiful presentation are sure to impress your guests and create a warm, inviting atmosphere.
- Make-Ahead Friendly: You can prepare the cake a day in advance, which means less stress on the big day and more time to enjoy with loved ones.
- Perfect for Sharing: This recipe yields plenty of servings, making it ideal for holiday gatherings, potlucks, or cozy family dinners.
- Customizable: Feel free to add seasonal fruits or favorite toppings to personalize your dessert table to your liking!
Trust me, this holiday dessert table is going to be the highlight of your festivities, bringing smiles and satisfaction to everyone who gathers around it!
Tips for Success
Let’s make sure your holiday dessert table shines with success! Here are some practical tips to ensure everything turns out perfectly:
- Measure Accurately: Baking is a science, so be precise with your measurements. I always use a kitchen scale for the best results, especially with flour and sugar!
- Room Temperature Ingredients: Ensure your butter and eggs are at room temperature before mixing. This helps create a smoother batter and better texture in your cake.
- Don’t Overmix: When combining your wet and dry ingredients, mix just until everything is incorporated. Overmixing can lead to a dense cake, and we want it light and fluffy!
- Check for Doneness: Ovens can vary, so start checking your cake a few minutes before the suggested baking time. A toothpick should come out clean, but a few moist crumbs are okay!
- Cooling Time: Let your cake cool completely before frosting. If you frost while it’s still warm, the frosting can melt and make a gooey mess—nobody wants that!
- Decorate with Seasonal Fruits: Fresh fruits like berries or citrus slices not only add color but also a burst of freshness that perfectly complements the rich cake. Plus, they make your dessert table look stunning!
- Add a Personal Touch: Don’t hesitate to sprinkle some festive toppings like crushed candy canes or a drizzle of caramel to make your cake stand out on the dessert table!
With these tips, you’ll not only create a delicious dessert but also a beautiful centerpiece that everyone will rave about. Happy baking!
Nutritional Information Section
When it comes to enjoying a delicious slice from your holiday dessert table, it’s good to know what you’re indulging in! Here’s a typical breakdown of the nutritional values for one slice of this delightful cake:
- Calories: 250
- Sugar: 20g
- Sodium: 150mg
- Fat: 12g
- Saturated Fat: 7g
- Unsaturated Fat: 3g
- Trans Fat: 0g
- Carbohydrates: 32g
- Fiber: 2g
- Protein: 3g
- Cholesterol: 40mg
Please keep in mind that these values can vary based on the specific ingredients and brands you choose. I always recommend checking the labels for the most accurate information. Enjoy your slice, knowing that it’s part of the sweet moments that make the holidays so special!
FAQ Section
Got questions about your holiday dessert table? Don’t worry, I’ve got you covered! Here are some common queries I often hear, along with my helpful answers:
Can I make this cake ahead of time?
Absolutely! This cake is perfect for making a day in advance. Just let it cool completely, frost it, and store it in an airtight container in the fridge. It’ll taste even better after a day of flavors mingling!
How should I store leftovers?
If you have any leftover cake (which I doubt, because it’s that good!), store it in an airtight container at room temperature for up to 3 days or in the fridge for up to a week. Just make sure to keep it covered to maintain its moisture!
Can I substitute ingredients?
Of course! Feel free to swap out the butter for a dairy-free alternative, or use almond milk instead of regular milk if you want a dairy-free version. You can also play with the sugars—coconut sugar or brown sugar can add a nice twist!
What if I don’t have cream cheese for the frosting?
No problem! You can use mascarpone cheese or even whipped cream for a lighter frosting. Just remember to adjust the sugar to taste, and you’ll still have a delicious topping for your cake!
How can I make this dessert table more festive?
Great question! Add some seasonal fruits, like pomegranate seeds or slices of orange, for color and freshness. You can also sprinkle some edible glitter or festive sprinkles on top for that extra holiday sparkle. Wow your guests with a beautiful presentation!
Serving Suggestions
Now that you’ve crafted a stunning holiday dessert table, let’s talk about what to serve alongside it to create an unforgettable experience for your guests! The right pairings can elevate your dessert spread and make your gathering even more delightful.
- Warm Beverages: Consider serving a rich hot chocolate or spiced apple cider. These cozy drinks complement the sweetness of your desserts beautifully and keep everyone feeling warm and festive.
- Coffee and Tea: A nice brew is always a hit! Offer a selection of coffee, including decaf and flavored options, along with a variety of teas. This gives your guests a chance to sip something warm while enjoying their sweets.
- Seasonal Fruits: Fresh fruit can balance the richness of your desserts. Think of a vibrant fruit platter with pomegranate, oranges, and berries. It adds color and a refreshing element to your dessert table.
- Cheese Board: A cheese platter can create a lovely contrast to the sweet treats. Include a mix of creamy brie, sharp cheddar, and tangy goat cheese, paired with some crunchy crackers and honey for drizzling.
- Ice Cream: If you want to take your desserts to the next level, offer a scoop of vanilla or peppermint ice cream. It pairs beautifully with cake, and the cold creaminess is a delightful contrast to the rich flavors.
These serving suggestions are all about enhancing the festive spirit and making your holiday dessert table a celebration to remember. So, gather your loved ones, pour some drinks, and enjoy the sweet moments together!
Storage & Reheating Instructions
After your delightful gathering, you might find yourself with some leftover cake (though I doubt it!). If you do, here’s how to store it properly to keep that deliciousness intact:
- Storing Leftovers: Allow the cake to cool completely before storing. Place it in an airtight container; this helps maintain its moisture and flavor. You can keep it at room temperature for up to 3 days or pop it in the fridge for up to a week. Just remember to cover it well!
- Freezing for Later: If you want to save some for a future craving, you can freeze the cake! Wrap individual slices tightly in plastic wrap, then place them in a freezer-safe bag or container. It can last for up to 2 months. When you’re ready to enjoy, just thaw it overnight in the fridge.
- Reheating: To serve again, you can enjoy it cold or gently reheat slices in the microwave for about 10-15 seconds. If you prefer a warm treat, you can pop it in a preheated oven at 350°F (175°C) for about 10 minutes. Just be careful not to overheat it; we want to keep that fluffy texture!
With these storage and reheating tips, you can savor the joy of your holiday dessert table long after the festivities are over! Enjoy each bite as it brings back those sweet memories!
Equipment List
To create your stunning holiday dessert table, you’ll need a few essential tools to make the process smooth and enjoyable. Here’s a handy list of what you’ll need:
- Mixing Bowls: A set of various sizes is perfect for mixing your dry and wet ingredients. I love using glass bowls so I can see what I’m working with!
- Measuring Cups and Spoons: Accuracy is key in baking, so a good set of measuring cups and spoons is a must. I always keep both dry and liquid measuring cups handy!
- Whisk: A sturdy whisk is essential for mixing batter and aerating ingredients. It’s one of my favorite tools to create that light, fluffy texture in cakes.
- Electric Mixer: Whether it’s a stand mixer or a hand mixer, this tool will save you time and effort when creaming butter and sugar or whipping frosting.
- Baking Pan: A standard 9×13 inch baking pan is perfect for this cake recipe. Make sure it’s well-greased to prevent any sticking!
- Spatula: A rubber or silicone spatula is fantastic for folding ingredients and scraping down the sides of your mixing bowls. It helps ensure everything is well combined.
- Toothpick or Cake Tester: This little tool is your best friend for checking if your cake is done. Just insert it into the center, and it should come out clean!
- Cooling Rack: Once your cake is baked, transferring it to a cooling rack helps it cool evenly and prevents a soggy bottom. This is crucial for a perfect frosting later on!
- Frosting Spreader or Knife: Use a small offset spatula or a butter knife to spread your cream cheese frosting smoothly over the cake. It makes decorating much easier!
Gather these tools, and you’ll be all set to create a dessert table that dazzles and delights! Happy baking!
Print
Holiday Dessert Table: 7 Irresistible Sweet Treats
- Prep Time: 20 minutes
- Cook Time: 35 minutes
- Total Time: 55 minutes
- Yield: 12 servings 1x
- Category: Dessert
- Method: Baking
- Cuisine: American
- Diet: Vegetarian
Description
A delightful assortment of desserts perfect for a holiday gathering.
Ingredients
- 2 cups flour
- 1 cup sugar
- 1 cup butter
- 4 eggs
- 1 cup milk
- 2 teaspoons baking powder
- 1 teaspoon vanilla extract
- 1/2 cup cocoa powder
- 1 cup powdered sugar
- 1/4 cup cream cheese
Instructions
- Preheat the oven to 350°F (175°C).
- In a bowl, mix flour, baking powder, and cocoa powder.
- In another bowl, cream butter and sugar until light and fluffy.
- Add eggs one at a time, mixing well after each addition.
- Stir in the vanilla extract.
- Gradually add dry ingredients and milk, mixing until smooth.
- Pour the batter into a greased baking pan.
- Bake for 30-35 minutes or until a toothpick comes out clean.
- For the frosting, beat cream cheese and powdered sugar until smooth.
- Once the cake cools, frost it and serve.
Notes
- Use seasonal fruits for decoration.
- Store leftovers in an airtight container.
- Can be made a day ahead for convenience.
Nutrition
- Serving Size: 1 slice
- Calories: 250
- Sugar: 20g
- Sodium: 150mg
- Fat: 12g
- Saturated Fat: 7g
- Unsaturated Fat: 3g
- Trans Fat: 0g
- Carbohydrates: 32g
- Fiber: 2g
- Protein: 3g
- Cholesterol: 40mg
Keywords: holiday dessert table, festive desserts, seasonal treats